CV入门(一)安装detectron2
在windows 10系统上安装detectron2。
环境依赖
给出自己的环境,低版本未测试。
- Python 3.7.2
- Pytorch 1.6
- pycocotools 2.0
- CUDA 10.2
- VS 2019 Community
安装 CUDA
cmd输入如下命令,测试CUDA是否安装成功。
nvcc -V安装 Pytorch
python和git这些基本的就不提了,介绍一下pytorch的安装。
进入pytorch官网,选择相对应的版本,使用pip直接安装。
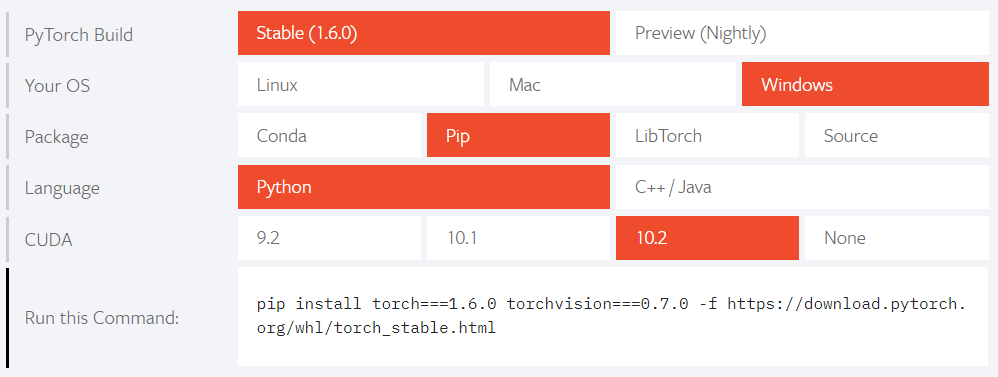
测试Pytorch是否安装成功。
import torch, torchvision
print(torch.__version__, torch.cuda.is_available())
安装 VS 2019
进入vs官网,选择community版本进行下载。
下载完成后,先不着急运行安装程序,按博客将安装目录迁移到非系统盘(C盘实在是装不下了)。
完成后,运行安装程序,选择C++组件即可,其他组件看个人需求选择。
安装 pycocotools
原版的pycocotools不支持windows,需要使用修改版。
可通过如下命令安装
git clone https://github.com/philferriere/cocoapi.git
cd PythonAPI
python setup.py build_ext --inplace
python setup.py build_ext install
或者直接
pip install git+https://github.com/philferriere/cocoapi.git#subdirectory=PythonAPI出现Successfully installed pycocotools-2.0即为安装成功。
安装 detectron2
git clone https://github.com/facebookresearch/detectron2.git修改文件 setup.py,注释掉
"pycocotools>=2.0.1",开始安装
python setup.py build develop安装过程无报错即可。
目标检测
python demo/demo.py --config-file configs/COCO-Detection/faster_rcnn_R_50_FPN_3x.yaml --input ../TestExample/test.jpg --output ../TestExample/output.jpg --opts MODEL.WEIGHTS ../TestExample/model_final_b275ba.pkl实例分割
python demo/demo.py --config-file configs/COCO-Detection/faster_rcnn_R_50_FPN_3x.yaml --input ../TestExample/test.jpg --output ../TestExample/output.jpg --opts MODEL.WEIGHTS ../TestExample/model_final_f10217.pkl可能出现的问题
安装时提示缺少什么包,直接pip install即可,出问题可以查stackoverflow。
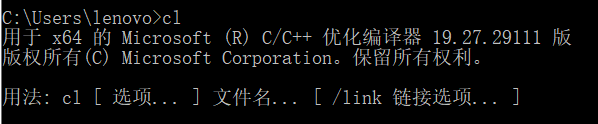
cl.exe出错
添加环境变量
C:\Program Files (x86)\Microsoft Visual Studio\2019\Community\VC\Tools\MSVC\14.27.29110\bin\Hostx64\x64如下即可
cocoeval出错
修改文件 detectron2.cpp
添加
#include <time.h>修改
localtime_r(&rawtime, &local_time);为
localtime_s(&local_time, &rawtime);nvcc.exe出错
修改文件 detectron2/detectron2/layers/csrc/nms_rotated/nms_rotated_cuda.cu
在11行
#ifdef WITH_HIP之前添加
#define WITH_HIP相关文章